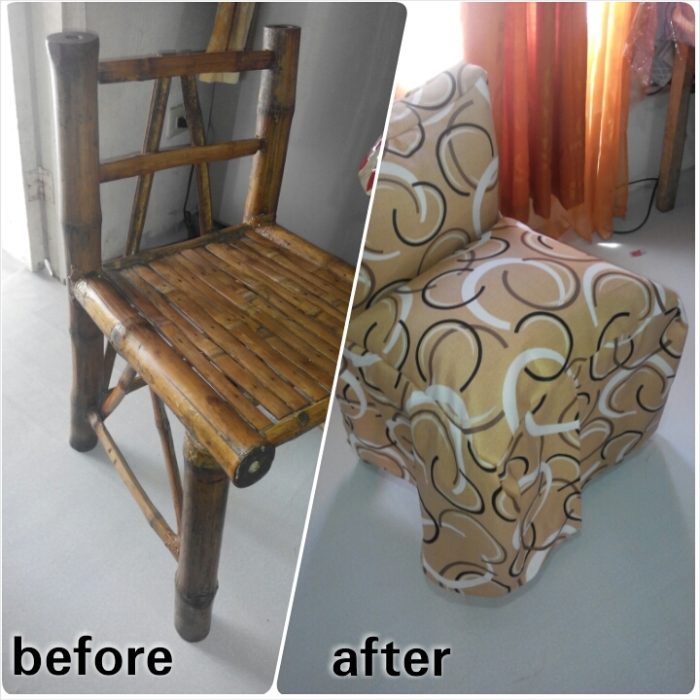
If you are someone that holds to sentimental values or feel that you can't just throw things away escpecially if those are still usable, then go for the environmental methods - reuse, recycle...and restyle. And with that said, I transformed an old chair to a new seat with old cushions and DIY slipcover. Check this out!

My father-in-law (deceased) made 3 bamboo chairs by hand the moment I lived with them after our wedding. When my husband and I moved in to our own house, we brought these as we didn’t have furniture yet. Now, we already have some but it makes me sad to just dismantle these as I know my husband would disagree. It’s some kind of memory of his father so I decided to keep them until these chairs don’t look good or not usable anymore.
Looking worn-out chair? Well, time for me to transform them into new seats. To make this happen, we need a slipcover to hide the old look of the chair. Add some cushions to make it more comfortable to sit on.
1. Let’s get started by preparing all the necessary sewing materials – scissors, needle, measuring tape, thread that is the same with the color of your textile, you don’t wanna see it mismatched. And pen and paper where you write the measurements of the slipcover. You can draw, as seen in the picture, if you don’t know the exact name of the part of the chair.

2. Follow the measurements of your chair and cut your textile accordingly. Lay them flat on the floor or table so you’ll be sure you don’t miss out something. The skirting can be cut later on so you can make as bigger ruffles on the skirt as you want.
3. Start sewing the textile together. I didn't have a sewing machine yet while I made this so I sew with my bare hands. I sewed the slipcover while putting the cut textiles on the chair. This way I can see (and imagine) how the slipcover looks like while I’m making it.
My boy, Railey, peeping through the old chair while I’m working. Kids are around so make sure you cover the pointed tip of the needle while pulling it up. Keep the scissors, pins and needles away from their reach when taking a pause of your sewing work. Constantly remind them the consequence if they play with those sharp objects.

4. Work on the skirting. Just make a fold on the part you want to make some ruffles. I didn’t put ruffles as I don’t have much textiles left. I just made a fold on the center front of the slipcover. But make sure to make it look like hanging. Here’s the proof that I sew this slipcover by hand – the line is not straight. I use many pins to keep the textile in place while sewing through back stitch style. I always use this style of stitch as it doesn’t make your sewn cloth easier to rip apart.

5. Only cover the back of the backrest, the lower part will be hidden as the seat will be placed against the wall. But it’s up to you if you want to cover the whole back portion. Remember the purpose to hide the old look of the chair.
6. Sew the all hems neatly to avoid run-offs.
7. Place the old cushions under the slipcover.
And here’s the result of the transformation…drumroll!

I transformed 2 of the old chairs for my 2 kids so they won’t argue over a single one. The other one is left out coz I was short of the textile but I still have plan to transform it too…sooner!


No comments:
Post a Comment